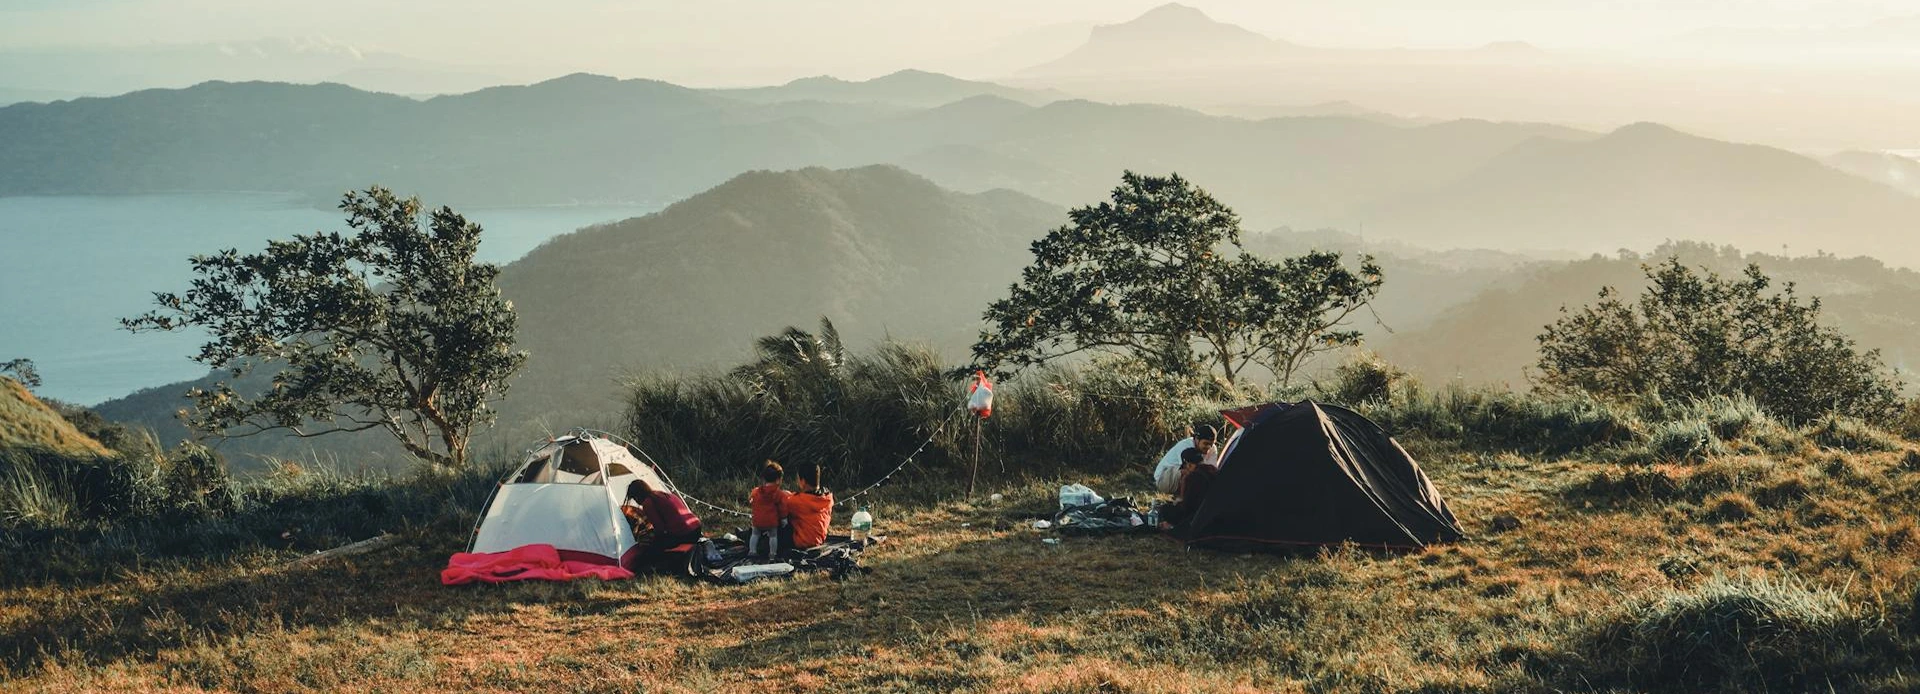
A good campsite setup does not start when the tent is already on the ground. It starts earlier, while you are still reading the site: the soil, the slope, the wind, the trees overhead, the likely water flow, and the way people will move through camp after dark.
For beginners, the goal is not to find the prettiest spot. The goal is to choose a dry, level, safe, and workable site. A campsite should function after rain, dinner, wind, a late-night exit from the tent, and the next morning’s pack-up. If it only feels convenient for the first ten minutes, it is not a good setup.
I do not place a tent wherever it feels easy in the moment. First I decide where the sleeping zone should be, where cooking can happen, where water and waste will sit, where boots and gear will go, and how people will walk between those areas. This is not a complicated system. It is basic camp discipline that prevents most small problems before they become irritating.
Quick Answer
To set up a campsite properly, first choose a level, slightly raised, well-drained site with no dead branches overhead. Place the tent where it will not sit in a water path, open directly into strong wind, or block movement through camp. Then separate the space into a sleeping zone, cooking area, water station, gear area, and clear walking paths.
What Campsite Setup Actually Means
Campsite setup is more than pitching a tent. The tent is the central object, but the whole camp does not end at the tent door. If shoes, cooking gear, water bottles, trash, and packs all collect at the entrance, even a good tent quickly becomes inconvenient.
A clean setup has several working zones. The sleeping zone should stay dry and relatively calm. The cooking zone should be stable and separate from the tent entrance. The water station should be easy to reach without making puddles around the shelter. The gear area should keep packs, boots, and small items out of the walking paths.
| Setup Part | Main Job | Beginner Risk | What to Check |
|---|---|---|---|
| Tent zone | Sleep, shelter, weather protection | Choosing a flat but poorly drained spot | Slope, ground firmness, water flow |
| Cooking zone | Stove use, food prep, cleanup | Setting it too close to the tent door | Wind, stable surface, movement |
| Water zone | Drinking water, hand washing, basic cleanup | Creating wet ground near the sleeping area | Drainage and distance from the tent floor |
| Gear zone | Packs, boots, tools, dry bags | Cluttering the main walking paths | Access, cover, and separation from food |
| Guyline and stake setup | Tent tension, tarp support, wind stability | Leaving lines across night walking routes | Visibility, angle, and traffic paths |
How to Choose a Campsite Before You Unpack
Before unpacking the tent, take a few minutes to read the site. This saves more time than it costs. Moving a half-built camp after you notice slope, roots, drainage problems, or a wind issue is much worse than walking the ground first.
I look at five things before I start: ground, drainage, overhead hazards, wind, and movement. The ground should be level enough for sleep, but it does not need to be perfectly flat. A perfectly flat depression often collects water. A slightly raised, firm, durable surface is usually better than a beautiful low spot.
There should be no dead, cracked, or questionable branches above the tent zone. Shade is useful, but not at any cost. If a tree looks unhealthy or has large dead limbs over the intended sleeping area, I keep looking.
| Site Feature | Good Sign | Bad Sign | Why It Matters |
|---|---|---|---|
| Ground | Slightly raised, firm, level enough | Soft moss, mud, roots, or a hollow | The tent floor needs support and drainage |
| Drainage | Water has somewhere to run away | A shallow bowl or visible water path | Rain will expose poor site choice quickly |
| Trees | Healthy canopy and clear overhead space | Dead branches above the tent | Overhead hazards are not worth the shade |
| Wind | Some natural windbreak nearby | Fully exposed ridge or open flat | Wind affects doors, guylines, tarps, and stove use |
| Movement | Clear space between camp zones | Tent blocks a trail or kitchen area | Camp should still work after dark |
Campsite Layout: Sleeping, Cooking, Water, and Gear Zones
After choosing the site, I decide where the tent will go first. Not the table, not the chairs, not the stove. The tent zone is the foundation. If the sleeping area is bad, the rest of the camp cannot fully compensate for it.
The sleeping zone should be the driest part of camp. The cooking zone should sit away from the tent entrance. The water station should be near the kitchen, but not where spills run under the tent or through the main path. The gear zone should be accessible without becoming a pile in front of the door.
| Zone | Where It Should Go | Why | Keep Away From |
|---|---|---|---|
| Tent zone | The driest, most level part of the site | Sleep and shelter should not depend on kitchen clutter | Low spots, roots, and water paths |
| Cooking zone | Separate from the tent entrance on stable ground | Reduces spills, smells, and blocked movement | Tent doors, sleeping gear, and loose fabric |
| Water station | Near cooking, but not beside the tent floor | Useful for drinking and cleanup without wetting camp | Main walking paths and the tent base |
| Gear zone | Near a vestibule, tarp, or ground layer | Keeps packs and boots out of the way | Food prep surfaces and entrances |
| Walking paths | Between zones without crossing guylines | Safer movement after dark | Stake lines, gear piles, and water runoff |
Tent Placement: Ground, Door Direction, and Drainage
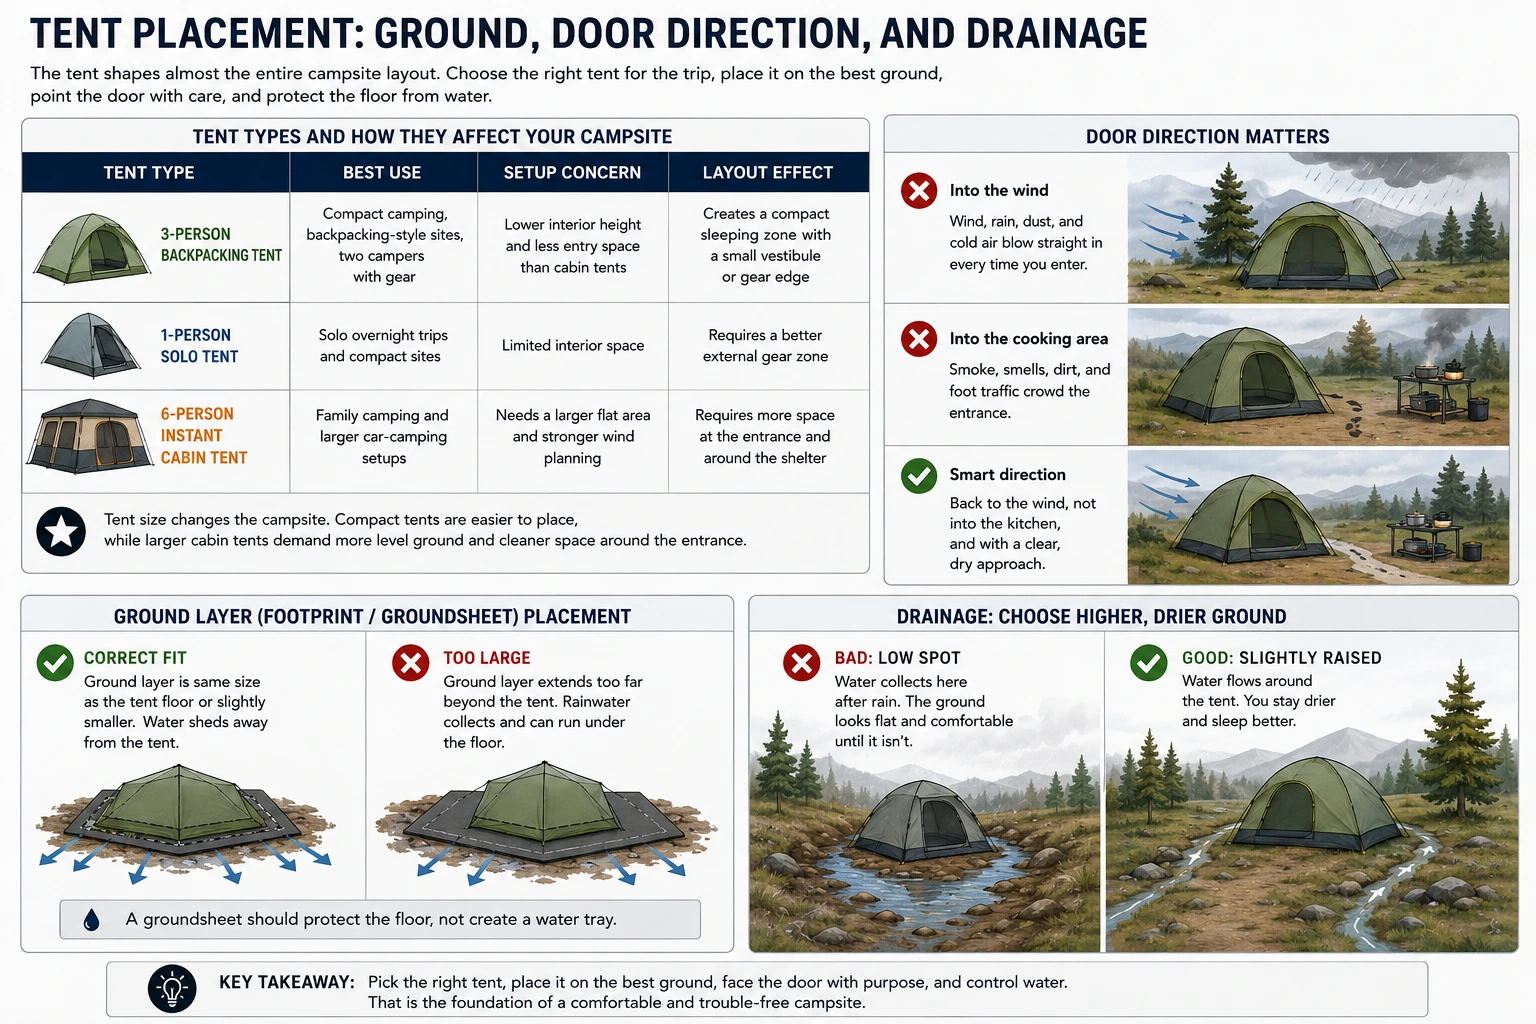
The tent shapes almost the entire campsite layout. Its size, floor shape, door position, vestibule space, wall height, and guyline needs affect how much room the site requires and how people move around it.
For beginner campsite setup, I think about tents in practical scenarios. A 3-person backpacking tent works well when the campsite needs to stay compact but still leave room for two campers and some gear. A 1-person solo tent fits tighter ground but demands better gear organization. A 6-person instant cabin tent gives more interior space, but it needs a larger flat area and more wind awareness.
| Tent Type | Best Use | Setup Concern | Layout Effect |
|---|---|---|---|
| 3-person backpacking tent | Compact camping, backpacking-style sites, two campers with gear | Lower interior height and less entry space than cabin tents | Creates a compact sleeping zone with a small vestibule or gear edge |
| 1-person solo tent | Solo overnight trips and compact sites | Limited interior space | Requires a better external gear zone |
| 6-person instant cabin tent | Family camping and larger car-camping setups | Needs a larger flat area and stronger wind planning | Requires more space at the entrance and around the shelter |
Do not point the tent door toward the best view automatically. Wind, rain, and movement matter more. If the door faces strong wind, every entry can blow dust, rain, or cold air inside. If the door opens straight into the cooking area, the entrance will become dirty and crowded.
A footprint can help when it is included with the tent or properly matched to the tent floor, but it still has to be placed correctly. If a ground layer extends too far beyond the tent floor, it can collect rain and guide water under the shelter. A groundsheet should protect the floor, not create a water tray.
Cooking Area and Food Zone
The cooking area should be close enough to use easily, but not directly at the tent entrance. I do not like a stove, food bag, water container, boots, and trash all collecting in the same small space in front of the door. It quickly becomes a dirty bottleneck, especially after dark.
Cooking needs a stable surface and enough air movement. A nearby covered utility area can help keep gear, water, or prep items out of light rain, but it should not create an enclosed pocket around open flame or stove heat. The important question is not only where the stove sits. It is where food bags, cleanup water, utensils, and walking space will be once dinner starts.
- Keep the stove away from the tent door. The entrance should stay clean and easy to use.
- Do not store food in the sleeping zone. Food belongs in a controlled food area, not beside sleeping gear.
- Plan cleanup before dark. Waiting until everything is wet, cold, or dark makes the camp messier.
- Leave the main path open. Cooking gear should not block the route between the tent, water, and vehicle or trail.
- Check wind before lighting the stove. Wind changes how safe and usable the kitchen area feels.
This article is not a full camp cooking guide. The point here is layout: where the cooking area belongs inside the campsite so it does not interfere with sleeping, gear, or movement.
Water, Waste, and Hygiene Station
A water station should be set up early. If it is not, water starts moving around the campsite without a plan: bottles near the tent, wet hands on sleeping gear, dirty dishes in the walking path, and trash collecting near the kitchen.
A simple system works well. Keep water near the cooking area, set one place for hand washing, keep a visible trash bag, and avoid mixing cleanup items with food prep surfaces. This does not need to be elaborate. It just needs to exist.
The waste area should be obvious. If the trash bag is hidden or inconvenient, people start leaving wrappers, wipes, and food packaging on tables, in pockets, near the entrance, or in gear piles. Once that starts, the whole campsite becomes harder to manage.
Weather Adjustments: Wind, Rain, Sun, and Night Movement
A good campsite setup should still work when conditions change. Dry, windless weather can hide poor choices. Rain, wind, sun exposure, and darkness show whether the camp was built with enough thought.
In rain, drainage matters first. A tent in a low spot will still be in a low spot even if the fabric is good. A footprint that extends too far can collect water. A utility area placed in a runoff path will become uncomfortable quickly.
A tarp can make the campsite more usable in light rain or hard sun, especially over a gear area, hammock, or simple utility space. But a larger tarp also needs a better pitch. If it is too flat, it can pool water. If it is poorly tensioned, it can flap all night. If it is broadside to wind, it can act like a sail.
In wind, stakes and guylines matter. Many beginners pitch the tent or tarp as if the weather will stay calm. Then they end up adjusting lines at night. It is better to check tension early, angle stakes properly, and keep guylines out of the main walking path.
Sun exposure also affects camp. Shade can be useful during the day, but it is not worth sleeping under questionable branches. Morning sun can heat the tent quickly, which may be good for drying condensation but bad if you want to sleep later.
Night movement deserves its own check. People rarely trip over the biggest objects. They trip over low lines, stakes, shoes, loose bags, and small gear piles. Reflective cord helps, but the better solution is a clear path.
Tent and Setup Examples for Different Campsite Layouts
The following examples fit different campsite layouts rather than one universal gear list. The useful question is not only whether a product is good. It is what kind of site it needs and how it changes the way the camp is arranged.
Naturehike Cloud-Up 3 Person Backpacking Tent with Footprint
The Naturehike Cloud-Up 3 Person Backpacking Tent with Footprint fits a more compact campsite layout than a large car-camping tent. It is useful when the sleeping zone needs to stay efficient, when the site has limited level ground, or when two campers want a tent that leaves some room for gear without moving into cabin-tent size.
A 3-person backpacking-style tent should still be judged by layout, not only by capacity. Three people may fit, but two campers with gear usually have a cleaner setup and less pressure around the entrance. The included footprint also makes ground choice more controlled, but it does not remove the need to avoid low spots and water paths.

| Brand | Naturehike |
|---|---|
| Model | Cloud-Up 3 Person Backpacking Tent with Footprint |
| Best For | Compact camping, backpacking-style sites, and two campers with gear |
| Key Strength | More compact campsite footprint than large family tents, with a footprint included |
| Main Limitation | Less headroom and entry space than a cabin-style camping tent |
ALPS Mountaineering Lynx 1-Person Tent
The ALPS Mountaineering Lynx 1-Person Tent works as a solo setup example. A small tent is easier to fit into a limited site, easier to move away from the cooking area, and less demanding on the ground than a large shelter.
A solo tent does not automatically make the whole camp clean and compact. Interior storage is limited, so packs, boots, wet layers, and small gear need a defined place outside the sleeping area. Solo campers often need better gear discipline, not less.

| Brand | ALPS Mountaineering |
|---|---|
| Model | Lynx 1-Person Tent |
| Best For | Solo camping, compact overnight setup, and small tent pads |
| Key Strength | Smaller footprint makes site choice easier |
| Main Limitation | Limited interior space for gear and bad-weather waiting |
CORE 6 Person Lighted Instant Cabin Tent
The CORE 6 Person Lighted Instant Cabin Tent is a larger family or car-camping example. Its advantage is interior space and a fast pitch style. Its trade-off is that the campsite must be chosen more carefully.
A cabin tent needs a wider flat area. If it is placed in a low spot, on a slope, or in an exposed windy location, the problem is larger than it would be with a small solo tent. The larger floor also makes door direction, entry space, and walking paths more important.

| Brand | CORE |
|---|---|
| Model | 6 Person Lighted Instant Cabin Tent |
| Best For | Family car camping, quick setup, and larger campsite layouts |
| Key Strength | Roomier interior and fast pitch style |
| Main Limitation | Requires a larger flat site and better wind awareness |
Gold Armour Rainfly Tarp
The Gold Armour Rainfly Tarp fits the overhead-cover side of campsite setup. It can work over a hammock, gear area, or simple camp utility zone where shade and rain protection matter. In a beginner campsite, a tarp like this is most useful when it supports the layout instead of becoming a second messy shelter.
A larger tarp gives more coverage, but it also asks for better pitch discipline. It needs solid anchor points, clean guyline routes, and an angle that sheds water. If it is pitched flat, rain can pool. If it is broadside to wind, it can pull hard on stakes and lines.

| Brand | Gold Armour |
|---|---|
| Model | Rainfly Tarp |
| Best For | Overhead rain cover, hammock use, gear shade, and camp utility space |
| Key Strength | Adds covered space outside the tent for rain, sun, or gear organization |
| Main Limitation | Requires good pitch angle, anchor points, and guyline management |
MSR Groundhog Tent Stakes
MSR Groundhog Tent Stakes fit the wind and shelter-tension part of camp setup. When a tent or tarp is poorly anchored, the campsite becomes louder, less stable, and more annoying to manage at night.
I would not treat upgraded stakes as mandatory for every camper. But on open sites, firmer ground, or windy forecasts, stronger stakes can be a practical improvement. They still depend on proper angle, soil type, and correct placement.

| Brand | MSR |
|---|---|
| Model | Groundhog Tent Stakes |
| Best For | Tent and tarp anchoring, windy campsites, and stronger guyline setup |
| Key Strength | Better holding power than many basic stakes |
| Main Limitation | Still depends on soil type and correct placement |
GEERTOP Reflective Guyline Cord
GEERTOP Reflective Guyline Cord is useful when tent or tarp lines sit near normal movement paths. It does not make a poor layout good, but it makes necessary lines easier to see after dark.
The best solution is still to keep guylines away from the main paths whenever possible. When that is not possible, reflective cord reduces the chance of someone walking straight through the tension system at night.

| Brand | GEERTOP |
|---|---|
| Model | Reflective Guyline Cord |
| Best For | Tent guylines, tarp lines, and nighttime visibility |
| Key Strength | Easier to see around camp after dark |
| Main Limitation | Does not fix poor guyline placement by itself |
Common Campsite Setup Mistakes
Most campsite problems come from rushing the first decisions. The mistakes below are common because they feel harmless at the beginning of the evening and become obvious only after rain, wind, darkness, or normal camp movement.
- Unpacking before checking the ground. Walk the site first. Look for slope, roots, drainage, tree hazards, and walking paths before gear comes out.
- Putting the tent in a low spot. A low flat area can look comfortable, but it is often the first place to collect water.
- Choosing tent size without checking the site. A larger tent gives more interior space, but it needs more clean, level ground and more room around the entrance.
- Pitching a tarp without thinking about water flow. A tarp should shed water away from the tent, utility area, and walking path. A flat tarp can collect water instead of solving the problem.
- Cooking too close to the tent. The tent entrance should not become a kitchen, trash point, and shoe pile at the same time.
- Ignoring wind direction. Wind affects door placement, stove use, tarp tension, and nighttime noise.
- Leaving guylines in walking paths. Lines that are visible in daylight are easy to miss at night.
- Skipping a water and waste station. Without one place for water and trash, small mess spreads across the whole campsite.
Limitations and Trade-Offs
There is no perfect campsite setup. Every choice has trade-offs. The goal is to understand them before you commit the tent or tarp, not after the camp is already built.
- Perfect flat ground vs drainage. A perfectly flat hollow may sleep well until rain collects under the tent. Slightly raised ground is often safer.
- Compact tent vs interior comfort. A backpacking-style tent saves ground space, but it gives less standing room and less casual interior space than a cabin tent.
- Shade vs overhead risk. Shade is useful, but dead branches over a tent are not worth it.
- Convenience vs safety. Cooking near the tent door feels easy, but it creates smells, clutter, spills, and blocked movement.
- Open view vs wind exposure. A beautiful exposed site can become tiring when wind hits the tent or tarp all night.
- Bigger tent vs bigger site requirement. Large tents are more comfortable inside but harder to place well.
- More tarp coverage vs more line management. A larger tarp can protect more space, but it also adds more guylines, stakes, wind load, and trip points.
- More accessories vs more clutter. Footprints, tarps, stakes, and reflective lines help only when they support a cleaner layout.
Frequently Asked Questions
What is the first thing to do when setting up a campsite?
The first step is to inspect the site before unpacking. Check the ground, drainage, overhead branches, wind direction, and walking paths. The tent should only go up after you know the sleeping zone is safe, dry, and workable.
Where should I place my tent at a campsite?
Place the tent on level, slightly raised, well-drained ground with no dead branches overhead. Avoid low spots, visible water paths, main trails, and positions where the door opens directly into cooking clutter or strong wind.
Should I use a footprint under my tent?
A footprint can help when it is included with the tent or properly matched to the tent floor. It still needs correct placement. If a ground layer extends too far beyond the tent floor, it can collect rainwater and direct it under the shelter.
Do I need a tarp over my campsite?
A tarp is not required for every campsite, but it can be useful for rain cover, shade, hammock use, or a cleaner gear area. It needs a proper pitch angle, secure anchor points, and guylines that do not cross the main walking path.
How far should the cooking area be from the tent?
The cooking area should be separate from the tent entrance. The exact distance depends on the site, but the stove, food prep, cleanup, and trash should not block the sleeping area or main walking path.
Is a bigger tent better for beginners?
Not always. A bigger tent is more comfortable inside, but it needs a larger flat area and more planning around wind and entry space. For small sites or compact camping, a smaller backpacking-style tent may be easier to place well.
What is the most common campsite setup mistake?
The most common mistake is pitching the tent before checking the ground, drainage, and movement through camp. A spot can look level but still be a low point, a runoff path, or the center of the main walking route.
Conclusion
A good campsite setup follows a sequence. First choose the right site. Then place the tent. After that, arrange the cooking, water, gear, tarp, and walking zones so they do not interfere with each other.
Tent type has a strong effect on layout. A 3-person backpacking tent creates a compact sleeping zone and can work well for two campers with gear. A solo tent fits smaller sites but needs better external organization. A large instant cabin tent offers more space but demands a wider, better-selected site. A tarp can improve the camp, but only when it is pitched with drainage, wind, and walking paths in mind.
The best beginner campsite is not the one with the most gear. It is the one where the tent stays dry and stable, the covered utility area sheds water properly, the kitchen does not interfere with the sleeping zone, water and waste have a defined place, and people can move through camp after dark without stepping over gear and lines.